Pages

Saturday, January 7, 2012

Corset Restrictions

One of the greatest restrictions placed on women has been corsetry. Severe lacing restricts movement and can damage internal organs and impair health. Female emancipators of the early 20th century used pictures which showed the position of the female internal organs with and without corsetry. Pictures of deformed rib cages were also used illustrate how breathing was impaired. They used the evidence to support their arguments for condemning the corset. There is considerable thought that such images of wasp waist were enhanced by artistic licence.

Picture of two female bodies with cut out views of internal organs and the possible deformation caused by lacing.Small waists did exist, but were usually on young girls and needed 'training'. Today when women take to corsets it can take about 2 years to achieve a gradually smaller waist using lacing methods. Goths are very fond of corsets in their fashion style.

Right - The unnatural hourglass figure.


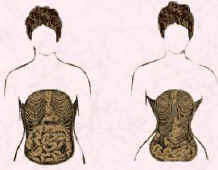
Typical images used in medical books and which suggested a woman's internal organs before and after restraining in tight corsetry in the Victorian era. Please note that even the Victorians were capable of manipulating pictures to their own end if it served a purpose.
Recent medical examinations of females corseted today in actual Victorian corsets show how the women had no energy and lacked breath when given lung tests. Once the corset was undone the women felt energised again.

The test is not a fair test as women did not simply lace immediately to a 16 inch waist, they trained the waist over a period of years. Over 2 years a 22 inch waist can be gradually reduced to a handspan by gradual increments of the lacing. It would take about a year of not wearing a corset for the internal organs to settle back to the natural position. But back they would go.

20th Century Modern Shoes

Picture of a white and green platform shoe with a 4 inch platform.Although foot binding seems cruel in the 21st century, modern shoes frequently deform the foot. Shoe lasts often show an evenly pointed shape around which modern shoes are built. The foot that fits the shoe made from a pointed last should have its big toe in the middle, flanked by two smaller toes on either side. Platform shoes which elongate the leg, but place the wearer in danger of ankle twisting, have come in and out of fashion several times in the last fifty years.


In the 1990s a famous incident occurred with platform soles, when Naomi Campbell slipped during Vivienne Westwood's fashion show whilst Miss Campbell was wearing very high platform shoes.
Left - A platform shoe by Vivienne Westwood.

Head Flattening, Elongation and Lip Stretching

Moulding of the skull and the practice of head flattening was common among Mayan society and has been used in Eastern countries. Protuberances such as the nose, ears and forehead were flattened to conform to the cultural beauty ideal. The head was flattened by putting the new born infant's head between two wooden boards creating a mouse trap like cradle, held in place with bindings. The soft skull slowly moulded to the cultural beauty ideal of flatness and after a few years the boards were removed permanently.

Elongated heads have been as popular as flattened heads. A Congo woman with an elongated head would be thought very beautiful by her people.

Similarly a Chad woman would have had her lips supported and stretched by metal rings since early childhood. In adulthood her stretched lips would express the ultimate in beauty. Western society has not gone quite this far, but it is now fashionable for some women to have collagen injections and implants to enlarge the lips.

Extremes include plastic surgery where the lips are turned inside out and although some find this an attractive feature on a woman, many do not and are repulsed by it.

Body and Breast Enhancement

Body image can be adapted to accommodate changing fashions. In the 1920s some women endured breast reductions so they could wear the flat boyish fashions. By the 1930s the breast in all its glory was soon back in fashion. The fuller the bosom the better. Expensive surgical enlargement was often done for people such as actresses, but not talked about much. More recently the silhouette from various angles has been manipulated even more by cosmetic surgery.

Nowadays people with ordinary incomes view breast enlargement as their right to satisfy emotional and fashionable needs. People of every age group have become obsessed by their body image. Older teenage girls particularly favour breast implants. Liposuction, tummy tucks, nose jobs, lip manipulation and implants for fuller breasts have all become popular in search of the ideal silhouette.

Cosmetic Surgery

In the Western world the outlines of women's bodies have been controlled by corsetry and petticoat constructions. But now many consumers have their figure faults corrected by cosmetic surgery with implants or liposuction fat reduction. Plastic surgery was originally developed thousands of years ago in India for treating injuries and birth defects. Then just over a century ago in 1885 when local anaesthetics were invented, surgeons began performing various cosmetic operations.

In 1901 the first face lift was done by Eugene Hollander of Berlin. The wealthy liked face lifts. A face lift meant they could actually buy some youth, even though the body cells were ageing.

Body Image

This page looks at how different societies view the body silhouette, the body image as ugly or beautiful. It examines some of the ways individuals have manipulated their body image, to gain the cultural ideal of an era.
Fashion history shows the most desirable body image of a fashion era is most often achieved by distorting the figure by enlargement or reduction, or by flattening or moving parts into new positions.

Fine Drawing Pens

Today a huge range of wonderful fine pens exist at about a fifth of the price of lesser models of twenty years ago. They can be used over a coloured sketch to sharpen it up instead of using a B pencil. They are very useful if you're trying to show intricate detail such as embroidery on a design.

Mounting Board for Presentation Work


Work may need to be presented for all sorts of reasons. It might be that you have a college interview or a job to apply for or you may just want to make your work look better for display purposes. So you'll have to learn to mount your work.

You can buy mounting board from good art shops for presentation work. Related or toning colours can be best. For final background boards try fairly neutral, but expensive dusty looking colours such as cream, taupe, olive, sand, grey blue, wine and black. A set of story boards all in one colour can look very attractive and thought out from a presentation point of view. Avoid crude background colours for boards. Aim to make your work have an look expensive look.

You can of course instead use CAD software such as Colour Matters.

A Sharp Knife


You will need a sharp Stanley type knife or surgical craft knife and replacement blades to trim card and paper. Don't try to use anything but a knife of this type to trim a hole out of the centre of a piece of mounting board. Never use a scissors as it will produce a very amateur result.

Metal Ruler


A metal safety ruler will give you better cutting edges than a wooden ruler that eventually develops little irregularities.

Suitable Adhesives for Fabric

For sticking fabric and braids I have found general PVA glue, Copydex and Evostick wood glue all very good. Don't apply too much of any of the glues and do allow time for the glue to get tacky and thicker before applying the fabric, so that the fabric does not absorb glue through to the top surface.

Cartridge Paper

In addition to layout paper, cartridge paper is ideal for fashion drawing and is thick enough for light painting with gouache or watercolours. If you use a heavy bold black felt pen template beneath the cartridge paper you can see just enough of the template outline to get the line of the silhouette and the correct body proportions.

Putty Rubber

A putty rubber can be bought from an art supplies shop. It's very useful because unlike an ordinary eraser it does not rub away the background paper.

Pencils

Pencils for fashion drawing should be soft B pencils. You will need a B or 2B for general sketching and a 4B for highlight and emphasis. Keep the 2B quite sharp and use the 4B to make the emphasis mark you like best.

When you make the light trace of the template beneath your layout paper, be sure to ensure the trace is just that - light.

Coloured Pencils

I like Caran d'Ache coloured water soluble pencils. These high quality Swiss made water soluble colour pencils come in 2 types - the Caran d'Ache Prismalo 3mm lead range and the Caran d'Ache Supracolor 3.7mm artist's range. These colours are great when you blend them in strokes or follow curvature and then use a damp paintbrush to create water colour paint effects and highlights with minimum effort.

Go easy and don't over wet or over draw. Be patient as you can slowly build more colour layers once its dry.

Felt Pens

Felt pens by Pantone can be used to great effect. The flesh tones can be used for skin areas like arms and legs and faces. They give good non blotching colour on layout paper. Some people like to colour the sketches they make using felt pens always. That's fine if that's your style, but do use quality felts as some cheaper versions run and blotch over outlines

Posture, Poses and Template Silhouettes

You should take care to note that anyone in period costume would stand more gracefully, sedately and modestly than a woman after 1960 might pose. So make any costume history drawings you do on very elegantly posed templates. Think about how the person you are trying to represent would look posture wise. If you can get the hair right you will also capture the spirit of an era.

The second factor for success is to keep to a theme when sketching a sheet of ideas. For example concentrate on interesting waist variations or necklines. The theme will give flow to your designs.

Fashion Silhouette Templates

The easiest way to draw fashion when you have limited skill is to use a template. Here are templates of a model pose in 3 sizes suitable for historical costume work or simple fashion designs. In the next 2 pages there are 2 modern stance fashion pose silhouette templates in strident pose and 2 elegant poses for free download.

If these are not suitable why not purchase my new ebook on Fashion Drawing Figure Templates ebook in a range of over 40 different poses with 5 sizes to each pose. There are many different poses in my ebook, including elegant, confident, sexy and strident poses as well as back and side view poses and a runner.

Layout Paper

Layout paper is a fine semi opaque paper that allows you to faintly see an image beneath it. This enables you to use a fashion or body template under the top sheet. It has a good quality for a semi opaque paper and is suitable for remounting onto firmer background papers and cards for presentation purposes.

The Basics of Fashion Sketching

This section is for those nervous of fashion drawing. The hints and tips appear as more detailed information in my ebook, the first Fashion Drawing Figure Templates ebook on the web.

You may have to do some fashion drawing as part of a course or you may simply want to sketch out an idea you have for a special evening dress, ball dress, wedding dress or bridesmaid's dresses. With a little technique most people who insist they cannot draw can achieve a satisfactory fashion drawing. To aid results use some of the following items - you will find the list helpful if you do not have a clue where to start

Wednesday, January 4, 2012

High Fashion - High Cost of Haute Couture

Dependant on the Haute Couture design house and the garment, the cost of a couture item runs from about £10,000 for a simple blouse to £40,000 and often beyond that figure. A Chanel couture suit for example in 2002 might have cost £20,000. By mid 2004 an evening frock cost £50,000. If you are not rich it's hard for an individual to understand why the price is so high, but it's for service, workmanship, originality of a unique design and superb materials of the finest quality.

In addition the client would get a perfection of fit only achieved by painstaking methods of cutting and fitting to the client's body. The manual labour needed to produce a garment this way takes between 100-150 hours for a suit and up to 1000 hours for an embellished evening dress. The evening dress might have thousands of hand sewn beads probably done by the expert and famous Parisian embroidery and beading firm of Lesage, founded in 1922 by Albert Lesage.

A couture house like Chanel for example will have about 150 regular clients who buy couture and a house like Dior will make about 20 couture bridal gowns a year.

What is Haute Couture?

Costume and Fashion history would not be the same without Haute couture.

Haute Couture is a French phrase for high fashion. Couture means dressmaking, sewing, or needlework and haute means elegant or high, so the two combined imply excellent artistry with the fashioning of garments. The purchase of a haute couture model garment is at the top level of hand customised fashion design and clothing construction made by a couture design house. A model haute couture garment is made specifically for the wearer's measurements and body stance. The made to measure exclusive clothes are virtually made by hand, carefully interlined, stay taped and fitted to perfection for each client.

An Interview with the Keeper of the Robes

In the interests of posterity it might have been wiser to have used satin from another source, since the fabric used is quite rotted. At an interview in the London Museum in 1978, Miss Kay Staniland, Keeper of the Robes, told me that the Queen's wedding dress, which has been displayed several times, was in an appalling condition; the main problem being the silk used for the dress. Miss Staniland described the silk as being very heavily tin weighted. She explained that the tin weighting was contributing to the continual deterioration of the fabric, speeding up the rotting process which starts as soon as any fabric is removed from the loom.

In the early 1970s, the dress was displayed with half a dozen other Royal wedding dresses. When Miss Staniland attempted to fit the Queen's dress to its polystyrene dress form she found that the weight of the embroidery dragged the skirt down, increasing the strain on the weave. To have left the dress on the form as it was, would have resulted in the skirt tearing from the bodice. The problem was solved by the construction of a calico skirt with tapes. This was used to support the heavy embroidered skirt and was secured to the form, without adding strain to the bodice.

Despite the fact that I was a serious costume student I was not allowed to even see, let alone handle the gown using special conservation gloves. However Miss Staniland kindly went to some trouble to show me photographs of the back view of the dress. The back fastening of the dress was not a zip, but a series of fourteen tiny covered buttons which were spaced closely together and stopped at the base of the spine. All the buttonholes had unravelled and beneath these there was a zip for additional support.

The left sleeve was badly frayed; the head having come completely away from the armhole, revealing a tear in the armpit. Some of the underarm degradation of the fabric was due probably to the combination of the metal salts in the silk and underarm perspiration which together speeded up the disintegration process. Anyone standing under intense camera lights knowing they would be watched by millions combined with the occasion of a marriage ceremony would perspire a great deal.


The keeper confided that gowns of this type were a nightmare to display and handle and from the Museum's point of view, the condition of this comparatively new dress was classified as poor. Already it was a conservation problem limiting the length of time it could be displayed even in the most carefully controlled conditions. Considering I was given that information a quarter of a century ago one can only speculate at the condition of the gown today. You are reading an original 'Queen's Wedding Dress' royalty fashion history article by Pauline Weston Thomas at

The Royal wedding group

The design was repeated throughout the length of the fifteen foot train and repeat motifs of embroidery bordered the sweetheart neckline, the long satin sleeves and the hem. Picture of Princess Margaret wearing a co-ordinating bridesmaid's dress.

Right - The beautiful embroidered train of the wedding dress.

Similar motifs were also featured on the complementary bridesmaids' dresses.

H. R. H Princess Margaret wearing a dress with motifs in the same style as those on her sister's dress.

Wisely, the Princess rejected the usual heavy heirloom lace so often worn by Royal brides, and instead chose a flattering soft white tulle veil that was half the length of the train. With it she wore a small Russian style sunray fringe tiara and a single row of pearls. You are reading an original 'Queen's Wedding Dress' royalty fashion history article by Pauline Weston Thomas at

The Hartnell Wedding Dress and Pictures

The following day the Princess walked down the aisle of Westminster Abbey on the arm of His Majesty King George VI. Right - Now we are married...

The richly embroidered white satin wedding dress shimmered with her every movement. Softly spaced throughout the dress were garlands of pearl orange blossom, syringa, jasmine and White Rose of York. These were skilfully combined with flowing lines of wheat ears, the symbol of fertility, and worked in pearl and diamante. Unique Wedding Favors and Decorations

Picture of wedding group with Princess Elizabeth II and Prince Philip in 1947.

Politically Correct Silkworms

The Queen Mother had specifically asked that Hartnell should use an unusually rich, lustrous stiff satin which was made at Lullington Castle. The satin was ideal for the train, but Hartnell thought that the dress required a more supple material of a similar tone. He ordered the similar fabric from the Scottish firm of Winterthur near Dunfermline. Difficulties arose when rivals put about the rumour that the Scottish satin was made from 'enemy silk worms', either from Italy or possibly Japan. A telephone call to Dunfermline settled the scandal. Mr. Hartnell was assured the silkworms were from Nationalist China and were not 'enemy silkworms'.

However politically correct the silkworms were, time has shown that the choice of silk was not a good one and below you can read some facts about the dress in my interview with Miss Kay Staniland, Keeper of the Robes in the London Museum in 1978.

But thirty years before in 1947 there was no immediate thought in Hartnell's mind that this would be a Museum piece of the future. His concern was to complete the gown as quickly and in as much secrecy as possible. Despite the many attempts of the press to bribe Hartnell's staff, the only glimpse newspapermen had of the dress, was when the covered four foot box containing the dress, left Hartnell's salon the day before the wedding.

Hartnell's Research

Less than three months before the wedding date, one of Hartnell's designs was approved and he began his research immediately. He describes this in his autobiography (1955): 'I roamed the London Art Galleries in search of classic inspiration and fortunately found a Botticelli figure in clinging ivory silk, trailed with jasmine, smilax, syringa and small white rose-like blossoms. I thought these flora might be interpreted on a modern dress through the medium of white crystals and pearls.'

Because of Wartime restrictions, the pearls were not available in this country, and eventually Hartnell obtained twenty thousand of the correct pearls from America. Once the pearls were in his possession Hartnell set about transferring the embroidery design to the paper pattern, but before the embroideresses could carry out the work Hartnell found himself in the throes of a publicity scandal. You are reading an original 'Queen's Wedding Dress' royalty fashion history article by Pauline Weston Thomas at

The Queen's Wedding Dress Designer - Norman Hartnell

In a sense, the Queen has been married twice. The first time she became wedded to Prince Philip; the second time at her coronation, she became wedded to the people. Each occasion demanded a dress of majestic beauty and on each occasion she chose dress designer, Norman Hartnell.

With his theatrical training, Hartnell was the ideal person to make spectacular dresses which would hold a stage of another kind.